
If you want to promote your mod, a big part of it is showing off your mod - visually. But just taking screenshots or recording a video isn't enough. If you want to show photos and trailers of quality, or how to get those downloading your mods to see how amazing your mod looks (we'll make it look amazing), start here.
Introduction
Most of the stuff I say about screenshots applies to trailers too. One should note that you will probably need a higher end system if you want to make trailers/videos with visual mods and ENBs, since filming videos can be quite taxing on your system, and it is quite important for a video to be smooth and not laggy since a jerky video can be quite off-putting.
To take good screenshots, you need mods. This is a fact. There is vanilla Skyrim, which can be pretty in a bleak, depressing way, and then there is modded Skyrim, which can be transformed into something beautiful, wild, or dangerous - all depending on your taste. While I'm usually a big fan of smaller visual mods when playing the game, for screenshots you want something to look a certain way, and light, reflections and other details play a big part in that.
Note: The below screenshots aren't a very good example of the huge difference that can be made, since I didn't have time to download an ENB and use it instead of IMAGINATOR, and my IMAGINATOR settings were a bit over the top. A huge difference can be made, seriously. Just look at the comparison images for mods like Static Mesh Improvement Mod.
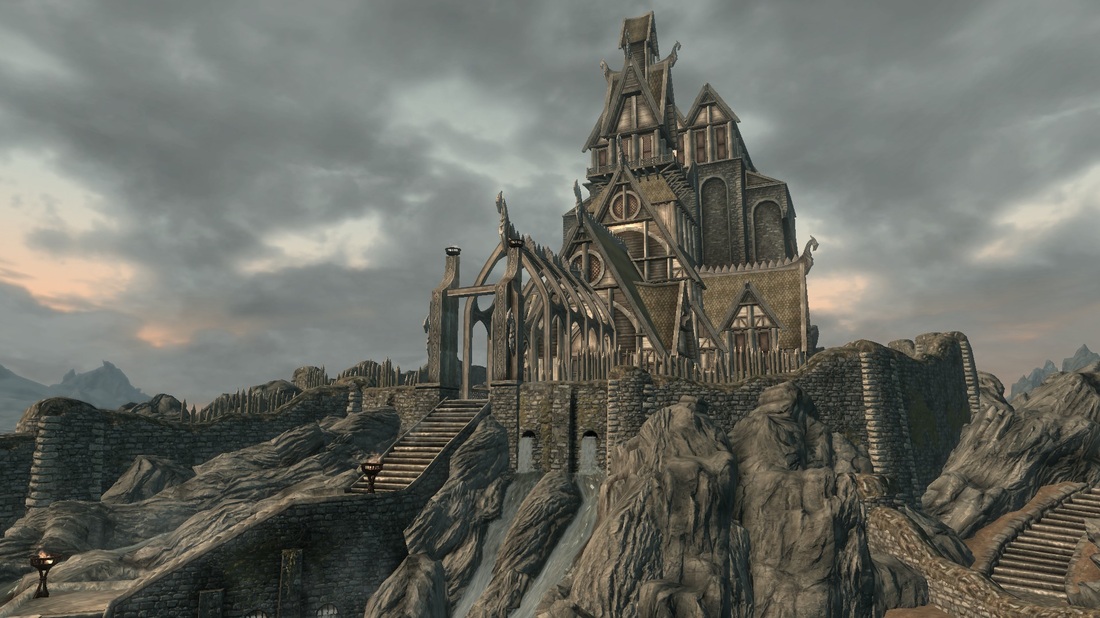 Skyrim, completely default and untouched by the beauty of mods. While it holds a certain gray charm, the other one is more saturated and the details are far prettier - the water, the colors of the sky, the contrast, and the lighting are better in the other picture. | 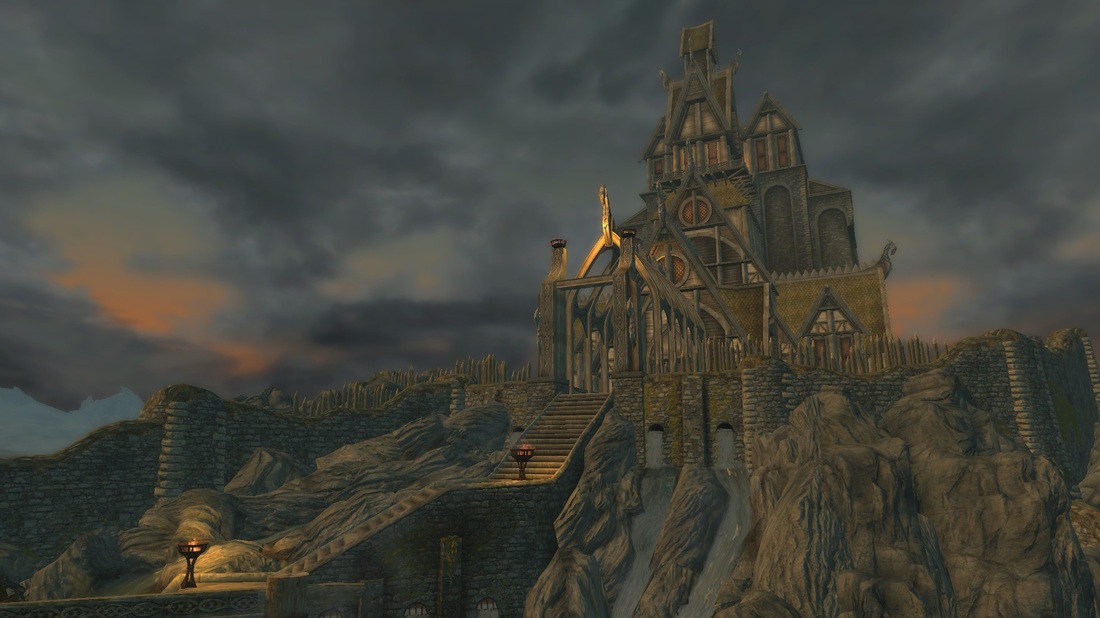 Skyrim, loaded with Realistic Lighting Overhaul, SMIM and Imaginator plus its MCM - and that's not even that many mods. You could have added fire, sky, stone, building, and many more texture enhancing mods too. |
Perception
Taking good screenshots is about more than having things just look pretty, though. You want those looking at your mod pages and sites to perceive things a different way. Taking a screenshot is about how it looks, but a big part of advertising and promoting your mod is deciding what message you want to send to those looking at your mods. This doesn't just apply to mods, really. It applies to anything you're trying to advertise or promote.
To give a real life example of this, as well as a small lesson in psychology (don't worry, it's not all that boring):
You walk into a grocery store, and the first thing you're greeted by is flowers. Beautiful, immense bouquets of flowers. You can't help but think of how fresh and beautiful the flowers look. You carry that idea of freshness with you, all the way to the meats section. Your mind associates the idea of freshness from the flowers with the meat, despite their differences, making you more likely to buy the meat, since it's "fresh".
It seems simple, but it's called priming (I prefer to call it suggestion). You can find some more examples and explanations in this article about priming.
Now how can this be used in modding? There are various ways. But I'll give you three, fairly common examples of screenshot techniques.
You should be able to get a sense of how these methods work from the above examples. As I said before, it's all about changing the viewer's perception of the thing. Now, onto taking good looking screenshots - all psychology aside.
To give a real life example of this, as well as a small lesson in psychology (don't worry, it's not all that boring):
You walk into a grocery store, and the first thing you're greeted by is flowers. Beautiful, immense bouquets of flowers. You can't help but think of how fresh and beautiful the flowers look. You carry that idea of freshness with you, all the way to the meats section. Your mind associates the idea of freshness from the flowers with the meat, despite their differences, making you more likely to buy the meat, since it's "fresh".
It seems simple, but it's called priming (I prefer to call it suggestion). You can find some more examples and explanations in this article about priming.
Now how can this be used in modding? There are various ways. But I'll give you three, fairly common examples of screenshot techniques.
- Using lots of lighting mods, texture mods, and mods like Imaginator (plus the MCM) before taking a screenshot to show your chosen focus for the screenshot in a better "light". If you're taking a picture of your new texture for a sword, doing this makes the sword look better, and people will think higher of the texture quality, and ergo, your mod. If you're taking a screenshot of a landscape, I recommend an ENB paired with a good texture mod.
- Using a certain "type" of texture or lighting mod when showcasing something you want associated with that "type". For example, using a particularly dark and gritty ENB when showcasing your mod about rising from the undead and fighting hordes of zombies. Alternatively, taking a screenshot of your focus with something you want associated with it works (i.e. a woman with multiple body- and hair-related mods wearing your new clothing).
- When showing something that you're saying is "bad", try to make it look bad. Turn your Skyrim settings down a bit, maybe tune down the brightness. Remember that this is all about perception. If somebody sees something darker and clearly lower quality, they'll associate that with the item in question. If you combine this method with number 1, it can work particularly well in comparison shots. Use this method for the vanilla or "bad" thing, and method 1 for the improved version.
You should be able to get a sense of how these methods work from the above examples. As I said before, it's all about changing the viewer's perception of the thing. Now, onto taking good looking screenshots - all psychology aside.
Preparation
To have a good screenshot, you'll need to prepare first. You won't want your HUD to show, unless you are specifically taking a screenshot of one of the in-game menus (in which case lighting and such doesn't matter quite as much, though you'll still want a good background to the menu since Skyrim's menus are semi-transparent). There are several ways to fix this. (I recommend 4, and not just for personal reasons.)
You'll also need to be positioned correctly (method 4 works well, though you can use method 2 and type "tfc" instead of "tm"). This includes having the best angle possible, so the light allows the viewer to see the focus of the screenshot well. This could mean different things, depending on the screenshot. For a shot of an evil character, you might want their face shadowed, but you wouldn't if you were showcasing a texture or mesh you'd created. It really depends on the picture, but you want your focus to be seeable and clearly be the focus.
Lighting is very important, and positioning plays a part in the way light looks in your picture. But you'll want to use method 4 or method 2 (with the console command "set gamehour to x", replacing x with the hour - on a 24 hour clock) to set the game hour so the actual light is the color you want, and the sky looks like you want it to. For prettier skies, I recommend this mod.
Lastly, you want the background of your screenshot to be good. If you want to emphasize one thing, you may want the background to be less prominent. If you're picturing an evil character, you may want the background to be that of a dark, Nordic ruin. Of course, if your screenshot is of the landscape itself, you'll want the landscape to be completely unobstructed by anything else.
- Change the HUD Opacity to 0%. You can achieve this by opening up your menu (most likely with Escape) and clicking on System up at the top. From there, go to Settings, and then Display. Move the HUD Opacity slider to the left until it reaches 0. This method is slow and becomes tedious if you take screenshots often. However, it doesn't remove the menus, unlike methods 2 and 4, so if for some reason you want to get rid of the HUD or not the menu, like making a video while playing the game, use this method. Otherwise don't. In fact, I recommend method 3 over this one, since it's more customizable.
- Use the console. There is a command in the PC version of the game that allows you to toggle the HUD. To use it, open up the console in-game (by pressing the tilde key (~), which can be done by holding Shift + the button to the of 1) and typing "tm" without the quotes. This is short for ToggleMenus. To restore your HUD and menus, repeat the before steps. Some people may be worried about losing Steam achievements by using the console. I've never experienced a loss of achievements because of this, but you might want to try method 3 or 4 if you want speed but no loss of achievements. This method is far faster than the prior method, but not the fastest. If you try to open a menu while your menus are off, your game will appear frozen and part of the screen will blur. This is because of the absence of a menu. This can happen if you open the console, which can be quite disorienting. As such, I recommend methods 3 or 4.
- Use a HUD mod to customize the way your HUD looks the way you want it. The three best are iHUD, Less Intrusive HUD II and Minimal HUD for Skyrim, though I personally think the latter is the best and most customizable. Most screenshots need nothing more than you toggling your menus off, so this may be a bit overkill. All three are great mods, though, and if you only want to show one part of the HUD, this method will work best for you. Still, for different screenshots you may need to adjust the settings which can be a bit of a hassle.
- Use a mod like Screenshot Hotkeys. Mods like my own give a bunch of features useful for screenshots, which the other methods won't do. Aside from toggling the menus, you can use the free cam to position yourself perfectly for screenshots, freeze those around you in the perfect pose (if you want) and set the game hour for the best lighting. Alternatively, you could use Screenshot Assist, which may or may not be currently mantained and slightly buggy, though it is a very well done mod with some different features than Screenshot Hotkeys (and some of the same).
You'll also need to be positioned correctly (method 4 works well, though you can use method 2 and type "tfc" instead of "tm"). This includes having the best angle possible, so the light allows the viewer to see the focus of the screenshot well. This could mean different things, depending on the screenshot. For a shot of an evil character, you might want their face shadowed, but you wouldn't if you were showcasing a texture or mesh you'd created. It really depends on the picture, but you want your focus to be seeable and clearly be the focus.
Lighting is very important, and positioning plays a part in the way light looks in your picture. But you'll want to use method 4 or method 2 (with the console command "set gamehour to x", replacing x with the hour - on a 24 hour clock) to set the game hour so the actual light is the color you want, and the sky looks like you want it to. For prettier skies, I recommend this mod.
Lastly, you want the background of your screenshot to be good. If you want to emphasize one thing, you may want the background to be less prominent. If you're picturing an evil character, you may want the background to be that of a dark, Nordic ruin. Of course, if your screenshot is of the landscape itself, you'll want the landscape to be completely unobstructed by anything else.
Tips and Tricks and Other Stuff
Tips and Tricks
There are a bunch of useful console commands to use when taking a screenshot. I've already mentioned a few, but I've compiled a short list for your benefit. To use these, you would simply press the tilde key (Shift + the button next to 1 on your keyboard, and below Escape), and type in the text in italics.
- tm - toggles the menus, useful in almost all screenshots to get rid of the ugly HUD
- set gamehour to x - set the time to a certain hour, based on a 24 hour clock - useful for lighting reasons
- tfc 1 - toggles the free cam, allowing to fly around, and see your own character - omitting the 1 will cause the command to not freeze time (tfc will occasionally transport you a distance away from your current location, so you may have to travel a bit to get where you want to)
- sucsm x - changes the speed of the free cam, replace x with the desired speed - 1 is the best speed for moving very slowly, extremely high values may cause crashes
- sw y - sets the weather to a particular weather - replace y with a weather ID from this weather ID list
If you're on a computer with Windows, you should have the Photos app. It's quite handy for applying a decent array of effects to pictures, though there are plenty of other programs you can use, including the free, advanced photo editor GIMP (which can do way more than just apply effects), or dozens of others.
When taking a screenshot, you may want to take more than one as a backup, and from more than one angle. I recommend taking about 5-7 screenshots for each picture you want, so you can pick through them.
If you want to take a picture of a city or a crowded place without people, you can try turning down the Actor Fade (under System>Settings>Display) as low as possible and taking a picture from a small distance away with tfc. The same method can be applied if you want to omit certain things from a picture.
Something to remember is that for screenshots, it doesn't matter of your computer is absolute crap. If it can get through the game without crashing, it doesn't matter - screenshots are still, so the viewer will never be able to see the horrible, horrible lag that may have been happening prior to the picture.
List of ENBs with screenshots
How to install ENBSeries (necessary to install before you download any ENBs)
How to install an ENB (video)
How to install an ENB (written)
How to install ENBSeries (necessary to install before you download any ENBs)
How to install an ENB (video)
How to install an ENB (written)
Recommended and Helpful Mods
I have compiled yet another list of mods that could be helpful to you while taking screenshots, including (but not limited to) ones I've previously mentioned in this post. When using these mods, you should always remember to backup your Skyrim folder, since you never know what may happen.
- IMAGINATOR + MCM - The IMAGINATOR is a fairly untaxing mod that allows you to fully customize how your game looks through a dialogue menu. However, the dialogue menu has had some issues in the past and I highly recommend using the MCM on top of the base mod, and completely foregoing the dialogue menu. The IMAGINATOR is great because of its high customizability, which allows it to be perfect for all sorts of screenshots. You may have to play around with the settings a bit at first, but you should learn it pretty fast. I recommend finding a look you like before taking the screenshot.
- Realistic Lighting Overhaul or Enhanced Lighting and FX - Both great lighting mods that I highly recommend.
- Enhanced Night Skyrim or HLP Night Sky - Two mods that make the night a thing of beauty.
- Enhanced Distant Terrain - Makes the distant terrain far less ugly.
- Real Roads for Skyrim or Immersive Roads (I recommend the former, for which I made a review) - Both are good mods that improve the look and feel of Skyrim's roads, though I personally prefer Real Roads.
- Project Parallax Remastered - A mod that adds parallax to almost everything. Compatible with Real Roads as long as you have the proper load order, which you can find on Real Road's mod page.
- Skyrim HD - 2K Textures or Tamriel Reloaded - Textures and Parallax (in which case don't use Project Parallax Remastered) or Serious HD Retexture Skyrim - All of these are great mods that give Skyrim a much better look, with far better graphics. 2K Textures includes a 1K textures version for those who need it.
- Skyrim Flora Overhaul or Lush Trees and Grass - Two mods to make the flora something to fawn over.
- SkyFalls and SkyMills - Animated Distant Waterfalls and WindMills - Makes sure waterfalls and windmills in the distance continue to animate and don't simply freeze. Compatible with all of the below water mods.
- WATER or Pure Waters or Realistic Water Two - All fantastic mods to make the water prettier and more realistic. It's really a matter of preference which one to choose.
- Static Mesh Improvement - SMIM - A mod that fixes the ugly appearance of (almost) all the statics out there. So things like barrels, containers, foods, and furniture have all been affected (and much more).
- Cinematic Fire Effects 2 or Ultimate HD Fire Effects - Brilliant mods that make fire look a dozen times more realistic. I personally prefer Ultimate HD Fire Effects, but it's up to you.
- RealVision ENB or BLEAK ENB - UNBLEAK ENB or Seasons of Skyrim ENB - There are a lot of different ENBs out there, but these are a few more well-known ones that show an array of different looks. I also found a list of ENBs with screenshots that might be helpful to some of you looking for the perfect ENB.
- ENB FXAA SweetFX Manager and Remover - A utility to help you manage your ENBs and safely remove them. I definitely recommend this if you're installing ENBs, since they can be tricky to work with.
- Screenshot Hotkeys or ScreenShot Assist - Mods that make it easier to prepare and set up your screenshots, resulting in more, faster, and better screenshots. I shouldn't really say this for (somewhat) obvious reasons, but I happen to prefer Screenshot Hotkeys.
If you've got any suggestions on what to add to the above list, then drop a comment below. I hope this has been helpful, and if you've got any questions, just post and I'll try to answer to the best of my ability.
 RSS Feed
